
4
can damage the paint layer or destroy the surface.
14. Use only original accessories.
CAUTION: DEFECTIVE OR DAMAGED EQUIPMENT AND IMPROPER
REPAIRS CAN CAUSE SIGNIFICANT DANGER TO THE USER.
BEFORE FIRST USE
1. Remove all packaging materials from the device.
2. Rinse the coffee maker with hot water three times. It is recommended to prepare the espresso when using for the
first time and then pour it out for hygienic reasons.
3. Use a dry paper towel to dry the unit both inside and out, making sure the area between the pot (B) and the water
tank (C) is dry.
4. Keep in mind that this device is for brewing coffee. Do not use any other extracts, cocoa powder, herbs, flowers,
sugars, infusion solvents, or other substances that may block the unit's filter openings.
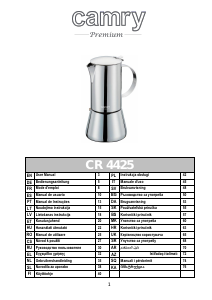
DEVICE DESCRIPTION: Espresso Coffee Maker - Figure I.
USE OF THE DEVICE - See figure II.
1. Check that the appliance is not hot after previous use. Grasp the jug (B) with a dry hand. Do not push or pull on the
handle (J). Grab the water tank (C) with your other hand. Turn the jug (B) counterclockwise until you unscrew the jug
(B) from the water tank (C), being careful not to push or pull on the handle (J). Once the unit is open, remove the
funnel filter (E).
2. Fill the tank (C) with water to a level below the safety valve (D). The safety valve (D) must NOT be under water.
Insert the funnel filter (E) into the water tank (C). Fill the funnel filter (E) with ground coffee to about 4/5 of its
capacity. Do not whisk the ground coffee heavily. The coffee should not be ground too finely.
3. Screw the pot (B) back onto the water tank (C). Make sure the flat strainer (F) and silicone gasket (G) are properly
installed and the coffee maker is tightly closed. Be careful not to push or pull on the handle (J).
4. Place the assembled unit over a heat source and set it over medium heat. Espresso coffee should not be prepared on
too strong a heat to avoid spillage and to avoid damaging the cafe. The device will start brewing. Espresso coffee will
begin to flow into the upper container through the inner tube (H) producing a small amount of steam and bubbling. Do
5. Remove the coffee maker from the heat source as soon as the bubbling stops, then the coffee will stop flowing out
of the inner tube (H). Grab the machine by the handle (J), open the lid (A), stir the coffee with a spoon directly in the
pot (B) then close the lid (A) and pour the coffee into the prepared cups.
CLEANING AND MAINTENANCE
1. Cleaning should be done after each use, but only after the machine has cooled completely.
2. Grasp the jug (B) with your dry hand. Grab the water tank (C) with your other hand. Turn the jug (B)
counterclockwise until you unscrew the jug (B) from the water tank (C), being careful not to push or pull on the handle
(J).
Remove the funnel filter (E).
3. Empty the funnel filter (E) of grounds and clean all parts with hot water and mild dishwashing liquid. Do not use
harsh or caustic cleaners. Dry completely. It is recommended to store the individual parts in a disassembled state.
Replacing the silicone gasket (G) and flat strainer (F)
After a long time, the gasket (G) and flat strainer (F) located on the bottom of the jug (B) on the outside may become
damaged.
The silicone gasket (G) will begin to disintegrate, and the flat strainer (F) will discolor or may lose its shape. Follow
the instructions below:
1. Replace only after the unit has cooled completely.
Unscrew the jug (B).


Приклучете се во разговорот за овој производ
Тука можете да го споделите вашето мислење за Camry CR 4425 Машина за еспресо. Ако имате прашања, најпрво прочитајте го прирачникот. Можете да побарате прирачник ако го употребите нашиот прирачник за контакт.